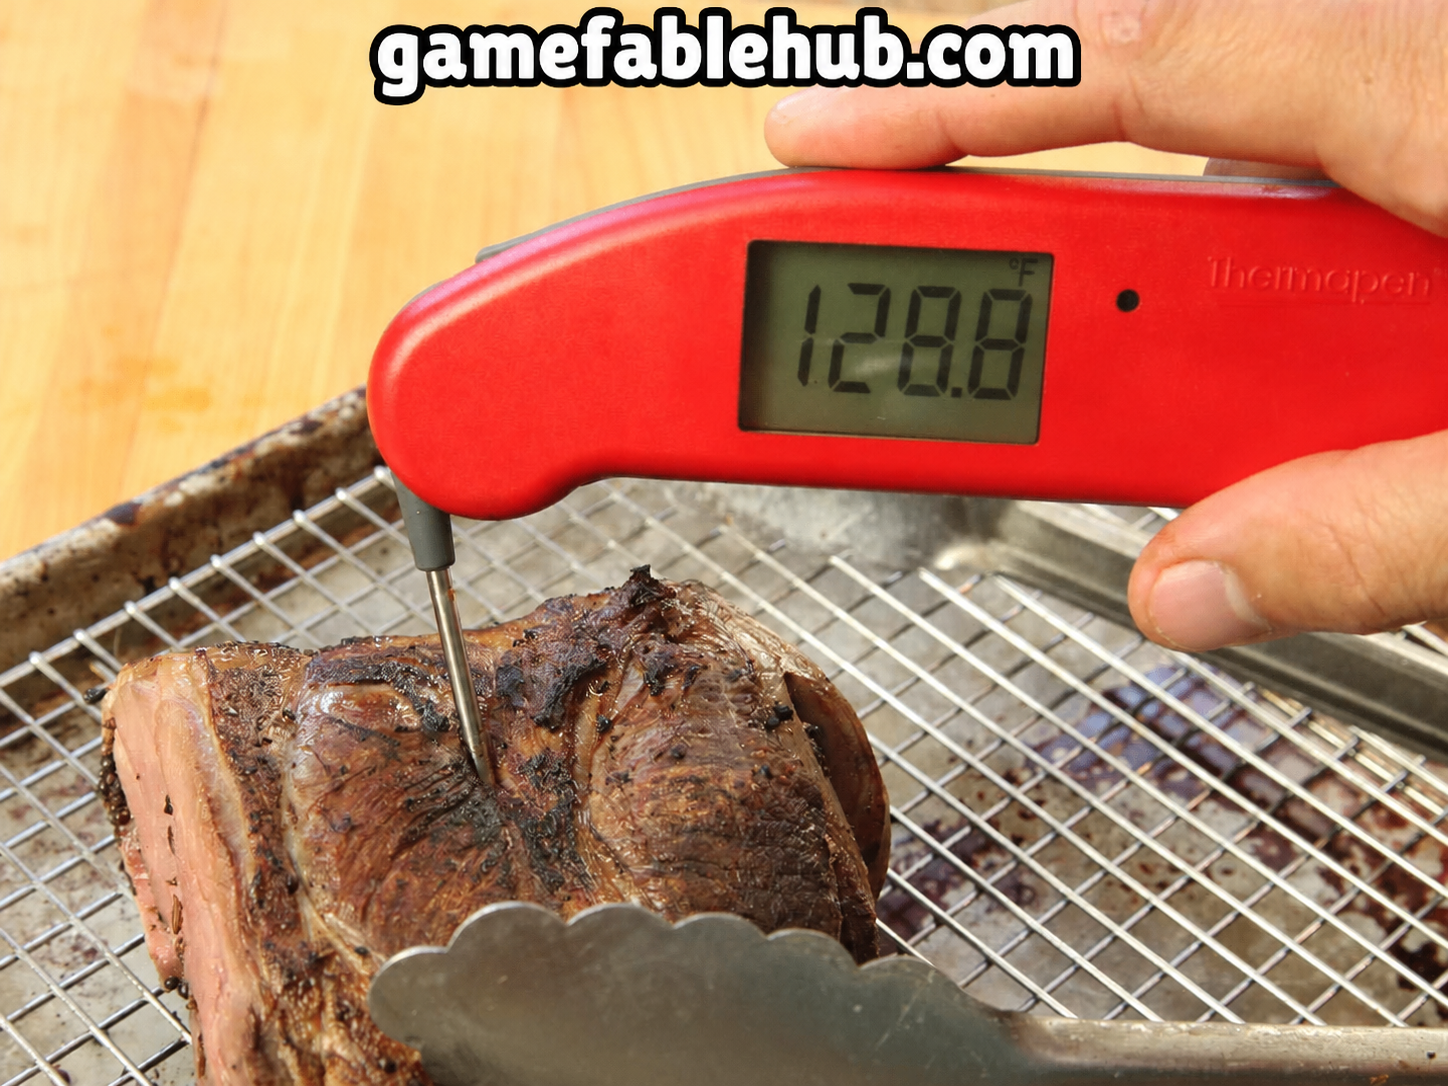
Learning how to use a meat thermometer starts with correct placement: insert the probe into the thickest part of the meat, position its sensing area in the center, and avoid bone, large pockets of fat, and the cooking surface. Wait for a stable reading, then compare it with the safe minimum temperature for that food.
For thin foods such as burgers or chicken breasts, inserting the probe horizontally through the side can make it easier to reach the center.
Table of Contents
A thermometer removes much of the guesswork from cooking. Browning, grill marks, clear juices, and cooking time alone do not reliably establish that meat has reached a safe internal temperature.
This guide explains the process, shows where to check different cuts, and provides a temperature chart based on U.S. federal home-cooking guidance.
Know Which Thermometer You Have
Before cooking, read the instructions for your particular model. Insertion depth, response time, cleaning requirements, and heat limits vary.
Instant-Read Thermometers
These are used to check food during or near the end of cooking.
Insert the probe, wait for the reading to settle, and remove it. Do not leave an instant-read thermometer in an oven or grill unless the manufacturer specifically says it is suitable.
Digital models can have different sensing areas, so do not assume that barely touching the meat with the tip is sufficient.
Leave-In Probe Thermometers
A suitable leave-in probe stays in the meat while it cooks.
Depending on the model, it connects to an external display through a cable or sends readings wirelessly.
Follow instructions about insertion depth, cable placement, and maximum temperatures. A probe intended for oven cooking is not automatically suitable for direct flame.
Dial Thermometers
Dial models may be oven-safe or instant-read.
Some measure temperature along a longer section of the stem. That makes correct insertion particularly important and can limit their usefulness for thin foods.
How to Use a Meat Thermometer Step by Step
1. Check the Instructions and Temperature Units
Identify the thermometer’s sensing area and required insertion depth.
Check whether the display uses Fahrenheit or Celsius. Confusing the two can lead to a serious cooking mistake.
For example, the poultry target of 165°F is approximately 74°C.
Make sure the thermometer is functioning normally and the display is readable before you begin handling hot food.
2. Clean the Probe
Wash the food-contact portion according to the manufacturer’s instructions before use.
Clean it between checks when it has contacted raw or undercooked food, and before using it on another item.
Do not immerse the display, battery compartment, connector, or other components unless the instructions explicitly permit it.
Keep clean utensils and plates available so cooked food does not return to equipment contaminated by raw meat.
3. Find the Thickest Part
Look for the thickest section of the meat.
For an irregular cut, identify several substantial areas rather than assuming one reading represents the entire piece.
Avoid measuring only a thin edge. It can reach the target before the thicker section is ready.
With bone-in meat, position the probe in the flesh without touching the bone.
4. Position the Sensing Area in the Center
Insert the probe far enough for its sensing area to sit inside the food.
On a thick roast, that may mean inserting from above or at an angle. On a thin burger, a sideways approach is usually more practical.
Do not push the probe through the meat until it touches the pan, tray, or grill grate.
The measurement needs to represent the meat’s interior.
5. Wait for a Stable Reading
Hold the probe still and wait as directed.
“Instant-read” does not mean every thermometer responds immediately. Reading too quickly can give you a number that is still changing.
If the result looks unexpected, check placement and allow another reading to stabilize.
Do not use the first briefly displayed number simply because it matches your target.
6. Check Additional Locations or Pieces
Check large or irregular cuts in several places.
When cooking several chicken pieces, burgers, or chops, check each piece. Similar size and cooking time do not guarantee identical internal temperatures.
If a location is below the required temperature, continue cooking and check again with a clean probe.
A leave-in probe can monitor one location, but other areas still need checking where appropriate.
7. Meet the Temperature and Resting Requirement
Compare your readings with the correct food category.
For beef, pork, lamb, and veal steaks, chops, and roasts, U.S. guidance recommends reaching at least 145°F/63°C before removal from heat, followed by a minimum three-minute rest.
Poultry and ground meat have different targets.
Do not assume that every food becomes safe at the same temperature or that an unmeasured increase during resting will make up the difference.
Safe Minimum Internal Temperature Chart
The following targets follow U.S. federal guidance for home cooking. Follow applicable local guidance and any product-specific cooking instructions.
| Food | Minimum internal temperature | Required rest |
|---|---|---|
| Beef, lamb, and veal steaks, chops, and roasts | 145°F / 63°C | At least 3 minutes |
| Pork steaks, chops, and roasts | 145°F / 63°C | At least 3 minutes |
| Ground beef, pork, lamb, and veal | 160°F / 71°C | No additional safety rest specified |
| Chicken, turkey, and other poultry, including ground poultry | 165°F / 74°C | No additional safety rest specified |
| Fish | 145°F / 63°C | No additional safety rest specified |
| Casseroles | 165°F / 74°C | No additional safety rest specified |
| Reheated leftovers | 165°F / 74°C | No additional safety rest specified |
| Stuffing cooked inside poultry | 165°F / 74°C | No additional safety rest specified |
These are safety targets. Some foods may be cooked further for a preferred texture.
Where to Insert the Thermometer in Different Foods
Understanding how to use a meat thermometer becomes easier when you match the approach to the food’s shape.
Chicken Breasts
Aim for the center of the thickest section.
For a relatively thin breast, insert from the side. Keep the sensing area within the meat rather than extending through the opposite surface.
Check each breast individually and confirm at least 165°F/74°C.
Chicken Thighs and Drumsticks
Insert into the thickest fleshy section while avoiding bone.
Change the angle if necessary. A reading taken against the bone should not be your final check.
Poultry parts need to reach at least 165°F/74°C.
Whole Chicken or Turkey
Check three locations:
- The innermost part of the thigh.
- The innermost part of the wing.
- The thickest part of the breast.
Each checked area must reach at least 165°F/74°C.
If the bird contains stuffing, check the center of the stuffing separately. It must also reach 165°F/74°C.
Burgers
Insert a suitable probe horizontally through the side so its sensing area reaches the center.
Check every patty.
Ground beef needs at least 160°F/71°C. Chicken and turkey burgers need 165°F/74°C.
Steaks and Chops
Measure in the thickest part, avoiding bone and substantial fat pockets.
A side approach may work better for thinner cuts.
For the whole cuts covered in the chart, reach 145°F/63°C before removing from heat and allow at least three minutes of rest.
Roasts
Check the thickest central region and several additional locations.
If using a leave-in model, verify its placement before cooking. Near completion, use appropriate additional checks rather than relying exclusively on one monitored spot.
Can You Leave a Meat Thermometer in the Oven?
Only leave it in if it is designed for that use.
The display, probe, cable, and connectors can have different limitations.
For a wired model, keep the external display where the instructions specify. Route the cable according to the manufacturer’s directions and avoid direct contact with flames or unsuitable heating elements.
Wireless probes also have insertion and temperature limits. Follow any minimum insertion marking.
An ordinary instant-read thermometer should be used for checks and then removed.
When uncertain, consult the manual rather than testing whether the thermometer survives oven heat.
How to Check Thermometer Accuracy with Ice Water
An ice-water test provides a useful accuracy check for a compatible thermometer.
Follow the manufacturer’s method. A typical process is:
- Fill a suitable glass with crushed ice.
- Add cold water to fill the spaces between the ice.
- Stir and allow the mixture to settle.
- Insert the sensing area to the required depth.
- Keep it away from the glass’s sides and bottom.
- Wait for the reading to stabilize.
The expected temperature is approximately 32°F/0°C.
Checking accuracy and calibrating are different. The test tells you whether the reading is correct; calibration adjusts it.
Some models can be adjusted, while others cannot. If yours reads incorrectly, follow the manufacturer’s calibration, service, or replacement instructions.
What If Different Spots Show Different Temperatures?
Different parts of a piece of meat can heat at different rates.
First, check that each measurement uses correct probe placement.
A reading near the surface or against the pan does not represent the same location as a reading in the center.
If correctly checked areas differ, continue cooking until the necessary areas meet the appropriate minimum.
For example, a whole chicken with a breast reading of 165°F but an inner thigh below that temperature needs further cooking.
Do not average the readings.
A higher number in one area does not compensate for an insufficient temperature elsewhere.
Recheck after further cooking, cleaning the probe appropriately between checks.
Common Meat Thermometer Mistakes
Measuring Only the Surface
A hot exterior does not establish the temperature at the center.
Insert the sensing area properly into the meat.
Using an Infrared Thermometer for Internal Doneness
An infrared thermometer measures surface temperature. It cannot replace a food probe for checking the interior.
Checking Only One Item
One cooked burger does not confirm that every burger is ready.
Check individual pieces, especially when their thickness or position differs.
Relying on a Preset Without Checking It
A thermometer’s preset may represent a preferred doneness rather than the safety target you need.
Confirm the actual numerical setting.
Reading Before the Display Settles
Allow the instrument’s required response time.
Treating Every Thermometer as Oven-Safe
A probe’s appearance does not establish its heat rating.
Using Color Instead of Temperature
Brown meat, pink meat, grill marks, or clear juices are not dependable substitutes for a correctly taken internal reading.
A Practical Chicken-Breast Example
Imagine cooking three chicken breasts in a pan.
Near the expected completion time, use a clean instant-read thermometer to check the thickest part of each breast.
Suppose the stabilized readings are:
- First breast: 165°F.
- Second breast: 158°F.
- Third breast: 162°F.
The second and third need more cooking.
Move the first to a clean plate using clean utensils. Continue cooking the others and check again with a cleaned probe.
Before serving, confirm each remaining breast reaches at least 165°F/74°C.
The example shows why checking one piece and assuming the rest are ready can lead to an unreliable result.
Cleaning and Storing Your Thermometer
Clean the probe after use following the product instructions, then dry it before storage.
Use a protective cover if supplied, and store the thermometer somewhere it will not be bent or damaged.
Do not assume a waterproof probe means the entire device is dishwasher-safe.
Inspect cables and connectors on leave-in models. Follow manufacturer guidance if you notice damage or erratic readings.
Keep the thermometer accessible so checking the food becomes part of cooking rather than an extra task you remember after serving.
Store the manual or model information where you can find it when checking calibration or cleaning instructions.
Frequently Asked Questions
How far should a meat thermometer go into the meat?
Insert it far enough to place the entire sensing area in the center of the thickest part. Required depth varies by model.
Can I use a meat thermometer in thin burgers?
Yes, with a suitable probe. Insert horizontally through the side so the sensing area reaches the center.
Is chicken safe at 165°F?
U.S. home-cooking guidance recommends at least 165°F/74°C throughout the relevant checked areas.
Can I remove meat early and rely on carryover cooking?
For the straightforward safety method in this guide, verify the stated minimum before removing it from heat and follow any required rest.
Does a thermometer make spoiled meat safe?
No. A temperature reading does not replace appropriate storage, handling, or attention to food recalls and product instructions.
Can I use an oven thermometer instead?
An oven thermometer measures the cooking environment. Use a suitable food probe to measure the meat’s interior.
Conclusion
Knowing how to use a meat thermometer means choosing the correct instrument, placing its sensing area properly, and waiting for a dependable reading.
Check the appropriate locations, compare them with the correct temperature target, and follow required resting instructions. With a clean, accurate thermometer, you can judge your cooking by a measurement rather than appearance alone.
About the Author